Monday, April 26, 2010

Rehab 4470 - Kitchen Cabinets are in!

The cabinets were installed while I was out of town this week and they look killer.  Quite honestly I think this is shaping up to the best kitchen redo we've ever done.  At any rate I'm excited that we are past tearing walls out and  now we are putting things back together. I'll put more pictures out there after we get the appliances, under counter lighting, granite, and back splash installed in the next few weeks.

I sometimes find it relaxing doing physical labor - it gives my brain a rest.  So today it was sanding sheetrock in the master bathroom, digging out the last stump in the front yard, removing the vanity in the second bath, removing the marble window sills in the dining room, and attempting to purchase tile for the house all before my noon cutoff time frame (after which we were headed to the beach with the guests). 

Actually we purchased the tile but the yo-yos could not find the key for the warehouse door so we could not pick it up and bring it back to the house.  It was going to take 3 trips total since my truck can only hold so much. 

In the afternoon we met with our realtor to look at a few houses on Anna Maria island.  Turns out he has a trailer that might make it a one trip excursion to pick up the tile.  So looks like Monday we'll make another attempt to pick up the tile.  Its 18 x 18 porcelain with a rough finish which makes it easier to walk it on with wet feet - like when you're walking between the kitchen and the pool for ice.

Wednesday, April 21, 2010

Rehab 4470 - Ready for the kitchen cabinets to be installed

We finished painting the kitchen in anticipation of the kitchen cabinets being installed tomorrow (Monday).  Overall we really like the color which is the same as the bedrooms.  We've used this color a lot and it seems to be pretty popular with the buyers.  We added some graffti to the wall where the cabinnets will be installed for posterities sake.

We also picked out some 18 x18 tile at Home Depot for less than $1 / ft.  The savings should cover the thin set and the grout that we'll need.  In total looks like we'll need about 1000 sq ft of tile = lots of weekends = sore back.   The tile has a smooth edge which makes it harder to hide the problems if there's any problem with the adjacent tile.  This can happen sometimes if the floor is not level and after jack hammering up the old grout I would not be surprised to find a few surprises when the tile starts to go in next weekend.  I'll check for low spots and float them before I start with the tile.


We also got the Master bedroom painted with minimial touchup to finish it off after repairing the walls from the border around the ceiling.  The master bath still needed some more joint compound following the first good sanding.  The Jack hammer got the rest of the linoleum off the floor so its looking ready for tile.  The linoleum in the second bathroom came up with minimal work.

The front yard is also shaping up with two of the three stumps out and the holes filled.  I also came up with the brillant idea to move the pygmy dates near the street to the places where I dug up the small trees in the front flower bed.  This will save money!!

More next time - happy rehabbing!

Monday, April 19, 2010

Rehab 4470 - The Electric Hammer Drill with Chisel Adventure

Next time someone (who will remain unnamed) wants to rip up old tile (that looks perfectly fine to me) and replace it with new 20" tile remind to me run away as fast as I can.  What started out as a reasonably good idea has been a lot of work and it is still not done. 

In the future it will not be underestimated again.

First we had the tile removed by a couple of guys resulting in box upon box of old tile pieces in the garage that we over time carted to the curb.  The boxes could not be too heavy otherwise the sanitation engineers would not accept them.  So we ended up making a couple of trips to the local liquor store for boxes (and a bottle or two, but not more than three, per trip).  Then we had to transfer from  the boxes in the garage to the smaller boxes and then cart it to the curb on the dolly.  Luckily Carrie (my daughter was over for a few days and helped).   Some how she could talk on the phone and pull the dolly.

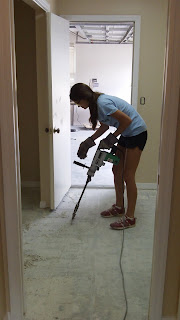
Removing the tile however was just the first step.  That left a considerable amount of thinset on the floor.  In fact too much to tile over and hence my new tool adventure for this project: 

The 20 lb Electric Hammer drill with a chisel bit.

If ever there is a man tool this is it!

It even makes a huge mess that you can have others clean up after you for days..

In all seriousness it works pretty good as long as the blade is sharp.  So needless to say I used a grinder to sharpen the blade after about every 10 minutes to chisel up the thin set.  Carrie even got into it and got pretty good at it.   It took about a half day but with the right angle and pressure the thinset flys off the floor.  There were a few areas that were very thick and I took out pieces of the floor but at least its all level and clean now.

Thanks to Carrie for all the help.  I don't see her that often and probably won't even more after this adventure!  Just kidding - after a while I couldn't get that tool away from her..


Friday, April 16, 2010

Rehab 4470 - Outside Paint Looking Good

Nick the painter started painting this past week and I'm dying to see how it looks.  With me being out of country (day job) and the camera just getting repaired, Jan has not been able to take any pictures (I have the other camera with me overseas).  She did say that the color, which by the way is the same as our house, looks great with the roof shingle color.  I was hoping it would as the roof shingles that are mostly grey do have some brown tones.  Nick will also be addressing some of the repair to the eaves which appear to have dry rot in a few minor places.

Nick does a great job and as any good painter will tell you it's all in the preparation.  Luckily this house is in great shape and there's not near as much foliage around it like our house.  He's got all the caulking completed and has started the seal coat everywhere.  That will be followed by 2 coats of paint.  I'll post some before and after pictures when I get them from Jan.


Followup:  Back in town and well it turned out great as can be seen from the before and after photos.  The brown really brings out the brown in the roof shingles and the black door really sets it off.  You can also see that most of the larger bushes are gone and the front of the house looks alot more open - don't worry landscaping and at least one big palm tree on the way to give it that Florida tropical feel and curb appeal!

Sunday, April 11, 2010

Rehab 4470 - Kitchen is making progress

Making Progress with Kitchen!

Kitchen is making real progress over the past week.  Between the old tile being removed, electric work completed and me getting back into town (finally) and getting the walls patched it's shaping up quickly.

Ripped the old tile up

The tile turned out to a bigger job than we thought.  Jan found a couple of guys to rip it up in one day. Problem is the amount of thin set that was used to mortar the tile in originally is mostly still stuck to the floor.  It's a nightmare and now the floor needs to be floated to level it out since the amount of old thin set is going to be hard to tile over.  At least when i'ts done the new 20 x 20 tile will look great against the new cabinets and granite counter top.

Getting rid of the old tile is another problem in and of itself.  There's 20+ boxes in the garage and although we can put it on the curb the boxes are heavy.  Guess we'll have to get more boxes and make them lighter loads.

The rewiring of the kitchen is complete

Lou came by today and finished up the rewiring of the kitchen.  The wires that were running down the wall between the kitchen and dining room were either moved to the backsplash to the left of the sink for the disposal and under cabinet lights on that side.  The other we put on the far wall between the kitchen and dining room.   He also installed a GFI outlet on the stove side of the kitchen.  The phone wire was saved and an outlet on the remaining wall sheet rocked and spackled over.

To rewire did mean some wall damage to get the wires down the drain pipe column next to the sink.  Luckily it did not take too long and Lou was good about saving the pieces he cut out making it quicker to repair.


Kitchen wall repair almost done

It took all of a day but I got all the walls fixed and the first layer of joint compound on everything before the end of the day.  Tomorrow lots of sanding and another coat of joint compound.  Keep up for a few days and it should be looking pretty good.  At this rate the kitchen will be ready for paint by the end of the week.  Maybe next weekend I'll get the floor floated before the cabinets go in next Monday.

Happy rehabbing..