Sunday, December 26, 2010

Our First Beach Place

After a two year search from Anna Maria Island to Siesta Key (and Longboat in between) we finally purchased a place at the beach on Lido Key a barrier island in Sarasota, Florida.  Over that two year period we looked at hundreds of properties, made over 10 offers, and drove 100's of miles.

In the end it came down to "lifestyle" and we had to chose between two places one of which we had previously made an offer that was rejected and now the owner wanted to accept the offer since another one he had fell through and the market had changed.  The other unit was close to an area we both loved and had spent a lot of time at over the years.

The place we did not select was a condo in Bradenton beach in a development called Bermuda Bay Club.
It's located about a haf mile north of Cortez on the bay side.  The unit we were looking at was one of two in the last building facing the bay.  3 stories, 3 bedrooms, 2.5 baths and a 2 car garage - 1700+ sq ft.  It was about 10 years old and had three balaconies, two of which faced the bay.  Looks of extras and probably at one time was the model for the development.  During the peak the unit sold for $900+K.  The beach is about a 2 minute walk but you can't see it from the unit.  There are some local buisnesses but the walk took you down the main drag and in some cases you took your life into your own hands.  Basically you had to drive to get to the good places.

The place we did select was a condo on Lido Key in a building called Lido Shores.  Its located about 5 minutes walk from one of the premier shopping and dining areas on the west coast of Florida called St. Armands Circle. 


View Larger Map

Lido Shores is located across the street from the Lido public beach.  The unit we selected is on the fourth floor and we have a view of the beach and the homes around St. Armands when looking out the east side.  2 Bedrooms, 2 bath, 1250 sq ft. with covered parking.  The unit was less $$ than the other and needed some work as parts of it had never been updated.  The Kitchen however had been redone and opened up to make a great room with the dining and living area. 

In the end we decided we liked the idea of parking the car on Friday and not having to drive anywhere since everything was close by.  Jan even created an office for me on the enclosed porch where I can work out of rather than head into the office - I actually get more done there!  What's not to like - plus now we've decided we like living at the beach so much we're thinking of selling this one and getting a bigger place.  If you're interested drop me a line..  If you are interested in a seasonal rental look for us on Facebook.


Saturday, December 18, 2010

Beach House Withdrawl

 
Lido Shores Condo 350 South Polk Dr

We started cleaning up the Beach House (condo) today since we are about 2 weeks away from moving out for 4 months while it's rented during high season.  In fact we've only got three renters over the four months of 2011 (Jan - Apr) and two have rented from the previous owner (who we purchased from) in the past.   There's a one month minimal rental period in the building and about a third of the owners rent.
Since we purchased the unit we have spent a considerable amount of time here and in fact have lived here continously for the past 3 months of 2010.  We were unsure if we'd really like it down here all the time and what we've found  "WE DO".  In fact we've already started a search for a bigger place that we can live in and have intentions of selling the house.  Yeap the house where we've lived for the past 10 years and finally got to just where we like it.


The Office that Jan set up for me

Living at the beach has been both relaxing and a lot more work.  Not only did we rehab the place but I also found that I ended up working out of the condo when I was in town.  It helped that Jan set me up a little office on the back porch when I was in China - it was a nice surprise when I got back.  I found that over time when I could not sleep I would starting checking emails or catching up on other work related tasks - hence the problem.  I work more at the condo that I ever have.  There's something to be said for getting up and going somewhere, like an office, and not starting work at the crack of dawn.  I'm an early guy anyway and when there's stuff to do I find it hard to lay in bed with my eyes open.

Our friends the Maguires
It is nice though to grab a cup of coffee, throw some clothes on, and walk across the street to the beach.   Or when it was a little warmer I'd do 5 miles to the bridge and back and then cool off in the ocean before tracking sand and water back up to the unit.  It's hard to explain how it decompresses the soul - perhaps it's the sound of the waves and water..

We've also had a lot of fun with our friends over the past 3 months.  The sunsets are spectacular here and our ritual seems to be sunset on the beach with cocktails or wine followed by a nice dinner upstairs or at the circle.   We've had a bit of a revolving door which we like and will miss the place over the next four months.

I consider us extremely lucky because never did imagine we'd actually have a place like this.  Now that we do we will be working even harder to get an even bigger an nicer dream.  All those nights, weekends, aches, and pains all seem worth it now.  Happy rehab and come visit us sometime, we'd love to have you.


Tuesday, December 14, 2010

Selling Rehab 4470 - Yahoo

We should be selling rehab 4470 tomorrow.   We have learned some very valuable lessons on this one and pretty much will break even on our investment.  However we lose the sweat equity which in some cases is very hard to quantitate outside of a lot of nights and weekends.  If I had to list the biggest factors into why it took 8 months to fix up and sell -our longest ever it attribute it to the following factors in retrospect.

Stick to your market

Traditionally we have worked in the <$200K market.  This way our first foray into the $200K + market and we found that there were just less buyers that were willing to pay that amount in the current market conditions.  So back to the basics!  There are also more buyers at lower prices.

Don't underestimate Negatives

This house had a few negatives that in the end were greater than we originally thought.  The first negative was it was a large house with only two bedrooms rather than 3 bedrooms.  Another was the back yard backed up to a fence and behind the fence was a ditch.  Several buyers said they liked the house but the back yard was just two small.  As a point of reference the house we flipped before this one had a wall and a busy street behind it - however there was room for a pool between the house and the wall.

Don't over improve

This can sometimes be the hardest thing to do.  This house had about 300 sq ft of tile in the kitchen and hallway that we jack hammered out and replaced with 18 x 18 tile.  Did we really need to do this?  It probably added $1000 in cost and a month of time between removing the old tile, jack hammering up the old thinset, and putting the new tile in.  It seemed like a good idea at the time.  We also took down a small wall between the kitchen and dining room and rerouted the electric - it ended up looking realy good but it can't say it helped sell the house for any more than we did.  Look at improvements really close - its easy to go over board.  At the end of the day the more you do the longer it takes - the longer it takes the more it costs and the market can change even more and usually not in your favor these days.

In retrospect we learned alot in doing this house and alot of it was what not to do.  the house turned out great and we are very proud of what we did.  I'd rather have money in the bank and have done less and gotr rid of it sooner. 

Guess we paid for that lesson with sweat equity - happy rehabbing.

Sunday, November 14, 2010

Living the Dream on Lido - Coffered Ceilings

It's been along summer and I've not had much time to blog since July.  Between work, finishing the last house and finally finding and rehabbing a condo near the beach (after a 2 year search) the year has gone quickly.  The good news is the remainder of the year should be relatively uneventful and we are looking forward to spending more time with our friends and family over the holidays.

As with most any project that Jan and I get into the Lido condo has been no different and had the usual surprises some of which were more costly than others.   We also tried some new things to make the property different and have had some pretty good feedback.

The condo was built in the 70's had concrete floors (and ceilings).  Needless to say there were no ceiling fans in the rooms and those that had added over the years were bolted to the ceiling and then the wire run through a metal conduit of sorts until it met the wall.  The wires were then either snaked through the wall to a switch or in the case of the Master bedroom the metal was continued down the wall close to a receptacle and then fan plugged in.  Pretty cheesy to say the least.

Not liking the wires and wanting to hide then we decided to try a cofferred (sp?) ceiling.  This would allow me to hide wires behind boards and give the room an updated look at the same time.  We decided on 1x5 MDF (medium density fiberboard) that looked like wood.  To hide the wire I routered out a groove on the side that would be against the ceiling.  I drilled a hole every 16 inches and then glued the board to the ceiling while propping the board up with 2x4's.  Then 3/4" cove on the inside of the MDF and crown around the outside where the wood on the ceiling met the wall.

The ceilings are 8 ft high so I was able to stand on the floor (with my new hammer drill) and drill holes straight up into the ceiling.  This was followed by Tapcons  and lots of spackle to fill in the holes by the countersunk tap cons.  Once the mdf was up the 5" crown was installed to round out the look which we've actullay beeen told makes the ceiling look taller than it is.  Gloss white paint and we are looking pretty good.  so good we decided to do all the rooms!

The best part is no wires running across the ceiling and no other unit in the building looks like ours and we took it up a notch.

Friday, July 9, 2010

Rehab 4470 - Working on the Front Yard

In the past we’ve been fortunate to not have spent too much time or money on the landscape. Probably the biggest time we’ve done is throw down a 10 x 10 brick paver porch to give the back yard some character along with a few nice plants. In fact at the last two houses we rehabbed did just that and the new owners proceeded to rip it out and either added a porch or a pool. Perhaps our outside creations inspired that! This house is perfect for a pool because of the large porch and quadruple sliders that totally recess to the porch.

Rehab 4470 however had yard problems and the landscape was just not cutting it. Since we had the house painted outside we decided to salvage some of the hedges and add some new stuff. Over the years the former owner had planted things here and there and the small trees in the front yard were held up with ropes tied to 3 foot metal rebar pounded into the ground. I found even more rebar in the garage. So we proceeded to cut down all the small trees and dig the stumps out (3 total). I got to buy a new hatchet to chop the roots out (yeah – new tool!). The picture to the right is me cutting down a tree in front of the Master bath window. If you look close you can see the rebar poking out of the ground.

We purchased the home at the end of winter which was actually quite cold this year in

Florida so the yard was pretty dead when we bought the house. I expected that when spring rolled around some water and sunshine would green it up. It did work for most of the yard with the exception of 2/3 of the front yard – wonderful. The spots that were not green were weeds. So I nuked the yard with Roundup and then proceeded to dig out the old stuff which then led to me ordering 2 pallets of sod (800 sq ft). Overall it looks pretty good and now we have to water it a lot until it takes otherwise green will become brown.

Jan originally purchased a bougainvillea tree to position outside the kitchen windows so you’d see it front inside but when we placed it out front we both realized it made the front of the house. So we proceeded to buy another ($50 each) and put them in black planters at the entrance along with river rock to give it a non cluttered look.
For the flower beds Jan convinced me to go with the red mulch (it has eucalyptus) which I have to admit looks better than I expected. I ordered 2 yards and we only did about half the beds – luckily we finished the front yard first. The border stones lining the beds were removed – they look like something a grandmother would do. For plants we stuck with hibiscus (yellow and red flowers) and border grass for replacement plants where we dug out the old stuff. Originally I wanted a couple of palms up near the front of the house and even toyed with moving the pygmy date palms near the street – 20 years of root growth changed my mind. It was like trying to dig through tendrils; besides the palms near the street look good. Inside I found 2 large White Bird of Paradise plants at Lowes and was able to get the price down from $200 to $75 for both.

Overall we think it turned out good – we laid the 2 pallets of sod, planted all the new plants, mulched, added ½ yard of stone and lowered the sprinkler heads on Friday and Saturday of the last weekend we worked on the house – it was hot and we were tired but it turned out great.

Friday, July 2, 2010

Rehab 4470 – Trimming the Windows and Plant Shelves

One of the easiest things that we do to dress up the inside of houses we work on is to wrap the windows which is essentially just adding trim around the windows and the sliding glass doors. It’s fast and adds a lot to the house and looks considerably better than the marble window sills that most houses in Florida have. We also always add trim to the plant shelves to add definition.

For windows you just need to break the caulk seal between the marble window and the wall (or window). Sometimes you can then pry the sill off. Most of the time I get the hammer out and break it into pieces. At one time I thought I’d be able to use the old sills or sell them – instead they took up valuable space in the garage. I install a new window sill out of finished pine. The new window sill is always 8” wider than the opening and 1” deeper than the old sill. I route an edge to give it a nicer look and cut out the portion of the sill that wraps around the sides of the window.

The sill is installed first using 2” brads followed by a piece of trim 1” shorter than the sill with the ends cut at 22.5 degrees. The fluted sides then go up next and are set back ¼ inch from the edge of the window. The top is a piece of molding that is as wide as the sides and cut at 22.5 degrees on the ends (occasionally we overlap it a ½ inch). Everything is nailed using 2” brads, then nails holes filled and caulked with white paintable caulk. At times there can be gaps between the new sill and the inside of the window because the window opening is not square. Small gaps can be caulked, larger gaps I use spackle and then sand it after it dries.

Most of the time the trim comes primed but the wood used for the sill never does and needs to be primed before the paint goes on. Otherwise the wood will soak up the paint differently than the other trim and not look good. For paint we use gloss white of high gloss ultra white and also paint the insides of the window opening. This gives it the look that we trimmed out the inside of the opening when all we did was paint it to match the trim.

The same concept can be used to trim out sliding glass doors. The only difference with sliders is we add an additional piece of wood across the top to give it a taller look. Other times we match the sliders to the nearby windows.

Obviously the bigger the window the more wood, trim, and paint needed. We estimate $50 -$75 a window and have found that it worth every penny. It really differentiates our house from all the others in the neighborhood and provides that wow effect that just adds to the overall look that we strive for. We want to the house to look better and different than the others.

BTW – the first time we trimmed out windows was our house years ago, one of the few times I did not learn something new on the job.

Saturday, June 12, 2010

Rehab 4470 - The Kitchen Is Done

I’ve been remiss lately in posting our progress to the blog. With travel and so much time away over the past few months seems like there’s not much free time. However we have made great progress on the entire house will the tile and hardwood completed – yahoo for my back! The kitchen has turned out really nice and we just have a little plumbing to complete in the next few days to finish it off.

I still question ripping up the 12 x 12 tile and putting in the 18 x 18 tile. It was a lot work. The new tile however turned out great and installation was easier than the last job even though the floors had bits of old grout even though we basically jack hammered the old floor out.

Mark did a great job on the cabinet installation and claims he’ll beat any bid. So if you need a cabinet guy I’d suggest you give him a call. As much as I would have liked to try to install them myself this time when there’s a guy like Mark I can focus on stuff that really needs to get done. He also did both bathroom vanities. Mark can be reached at 941-232-5631.
Granite from Johny exceeded our expectations and looks great. We had the same granite installed in the bathrooms. The large slab concept we added where we removed the wall turned out great and gave the desired effect we were looking for. We do regret not installing a couple of hanging lights over the large slab.  Check a previous blog for Johny's contact info.

Lou did marvels with the electric as always. Even he questioned what some of the wires were for when he saw the mess when we took down the side wall between the kitchen and the dining room. It was just a matter of moving the switches to adjacent walls and running new wire down the pillar that ran to ceiling. With vaulted ceiling there was not too much room to work in for Lou. He does great work at a fair price.  Send me a note if you need an electrician

We opted not to install a granite backsplash and tiled the backsplash with sheets of 2” travertine looking tiles. We found 12 x 12 sheets at Lowes on Clearance for around $3.50 / sheet. They fit almost perfectly and we used the same grout we used for the floor. Jan did all the grouting and switched out all the electric receptacles (great job honey – now I gotta teach you how to lay tile! I’ll stick to laying wood). We also reused the old under counter lights and just had to replace the light bulbs so all the light colors looked the same. The new bulbs made by GE for kitchens and baths actually bring out the backsplash color quite a bit.

Appliances were another story. After Lowes delivered a white stove with the stainless frig, dishwasher and microwave they delivered a stainless steel stove that did not work. Turns out it was discontinued and they had no others. They actually tried to get us to pay more – their argument was they had to give us a better stove because they had none of the ones we ordered. My argument was I wasn’t going to live there and didn’t care how nice it was. They finally delivered a current year model that matched all the others appliances – needless to say we got an $850 stove for $500. I almost want to replace our Kitchenaid unit at home it’s so nice. Give it to Lowes – they made it right as they always do.

A few more weekends of small stuff and this place is ready to be on the market!

Monday, April 26, 2010

Rehab 4470 - Kitchen Cabinets are in!

The cabinets were installed while I was out of town this week and they look killer.  Quite honestly I think this is shaping up to the best kitchen redo we've ever done.  At any rate I'm excited that we are past tearing walls out and  now we are putting things back together. I'll put more pictures out there after we get the appliances, under counter lighting, granite, and back splash installed in the next few weeks.

I sometimes find it relaxing doing physical labor - it gives my brain a rest.  So today it was sanding sheetrock in the master bathroom, digging out the last stump in the front yard, removing the vanity in the second bath, removing the marble window sills in the dining room, and attempting to purchase tile for the house all before my noon cutoff time frame (after which we were headed to the beach with the guests). 

Actually we purchased the tile but the yo-yos could not find the key for the warehouse door so we could not pick it up and bring it back to the house.  It was going to take 3 trips total since my truck can only hold so much. 

In the afternoon we met with our realtor to look at a few houses on Anna Maria island.  Turns out he has a trailer that might make it a one trip excursion to pick up the tile.  So looks like Monday we'll make another attempt to pick up the tile.  Its 18 x 18 porcelain with a rough finish which makes it easier to walk it on with wet feet - like when you're walking between the kitchen and the pool for ice.

Wednesday, April 21, 2010

Rehab 4470 - Ready for the kitchen cabinets to be installed

We finished painting the kitchen in anticipation of the kitchen cabinets being installed tomorrow (Monday).  Overall we really like the color which is the same as the bedrooms.  We've used this color a lot and it seems to be pretty popular with the buyers.  We added some graffti to the wall where the cabinnets will be installed for posterities sake.

We also picked out some 18 x18 tile at Home Depot for less than $1 / ft.  The savings should cover the thin set and the grout that we'll need.  In total looks like we'll need about 1000 sq ft of tile = lots of weekends = sore back.   The tile has a smooth edge which makes it harder to hide the problems if there's any problem with the adjacent tile.  This can happen sometimes if the floor is not level and after jack hammering up the old grout I would not be surprised to find a few surprises when the tile starts to go in next weekend.  I'll check for low spots and float them before I start with the tile.


We also got the Master bedroom painted with minimial touchup to finish it off after repairing the walls from the border around the ceiling.  The master bath still needed some more joint compound following the first good sanding.  The Jack hammer got the rest of the linoleum off the floor so its looking ready for tile.  The linoleum in the second bathroom came up with minimal work.

The front yard is also shaping up with two of the three stumps out and the holes filled.  I also came up with the brillant idea to move the pygmy dates near the street to the places where I dug up the small trees in the front flower bed.  This will save money!!

More next time - happy rehabbing!

Monday, April 19, 2010

Rehab 4470 - The Electric Hammer Drill with Chisel Adventure

Next time someone (who will remain unnamed) wants to rip up old tile (that looks perfectly fine to me) and replace it with new 20" tile remind to me run away as fast as I can.  What started out as a reasonably good idea has been a lot of work and it is still not done. 

In the future it will not be underestimated again.

First we had the tile removed by a couple of guys resulting in box upon box of old tile pieces in the garage that we over time carted to the curb.  The boxes could not be too heavy otherwise the sanitation engineers would not accept them.  So we ended up making a couple of trips to the local liquor store for boxes (and a bottle or two, but not more than three, per trip).  Then we had to transfer from  the boxes in the garage to the smaller boxes and then cart it to the curb on the dolly.  Luckily Carrie (my daughter was over for a few days and helped).   Some how she could talk on the phone and pull the dolly.

Removing the tile however was just the first step.  That left a considerable amount of thinset on the floor.  In fact too much to tile over and hence my new tool adventure for this project: 

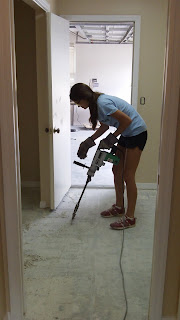
The 20 lb Electric Hammer drill with a chisel bit.

If ever there is a man tool this is it!

It even makes a huge mess that you can have others clean up after you for days..

In all seriousness it works pretty good as long as the blade is sharp.  So needless to say I used a grinder to sharpen the blade after about every 10 minutes to chisel up the thin set.  Carrie even got into it and got pretty good at it.   It took about a half day but with the right angle and pressure the thinset flys off the floor.  There were a few areas that were very thick and I took out pieces of the floor but at least its all level and clean now.

Thanks to Carrie for all the help.  I don't see her that often and probably won't even more after this adventure!  Just kidding - after a while I couldn't get that tool away from her..


Friday, April 16, 2010

Rehab 4470 - Outside Paint Looking Good

Nick the painter started painting this past week and I'm dying to see how it looks.  With me being out of country (day job) and the camera just getting repaired, Jan has not been able to take any pictures (I have the other camera with me overseas).  She did say that the color, which by the way is the same as our house, looks great with the roof shingle color.  I was hoping it would as the roof shingles that are mostly grey do have some brown tones.  Nick will also be addressing some of the repair to the eaves which appear to have dry rot in a few minor places.

Nick does a great job and as any good painter will tell you it's all in the preparation.  Luckily this house is in great shape and there's not near as much foliage around it like our house.  He's got all the caulking completed and has started the seal coat everywhere.  That will be followed by 2 coats of paint.  I'll post some before and after pictures when I get them from Jan.


Followup:  Back in town and well it turned out great as can be seen from the before and after photos.  The brown really brings out the brown in the roof shingles and the black door really sets it off.  You can also see that most of the larger bushes are gone and the front of the house looks alot more open - don't worry landscaping and at least one big palm tree on the way to give it that Florida tropical feel and curb appeal!

Sunday, April 11, 2010

Rehab 4470 - Kitchen is making progress

Making Progress with Kitchen!

Kitchen is making real progress over the past week.  Between the old tile being removed, electric work completed and me getting back into town (finally) and getting the walls patched it's shaping up quickly.

Ripped the old tile up

The tile turned out to a bigger job than we thought.  Jan found a couple of guys to rip it up in one day. Problem is the amount of thin set that was used to mortar the tile in originally is mostly still stuck to the floor.  It's a nightmare and now the floor needs to be floated to level it out since the amount of old thin set is going to be hard to tile over.  At least when i'ts done the new 20 x 20 tile will look great against the new cabinets and granite counter top.

Getting rid of the old tile is another problem in and of itself.  There's 20+ boxes in the garage and although we can put it on the curb the boxes are heavy.  Guess we'll have to get more boxes and make them lighter loads.

The rewiring of the kitchen is complete

Lou came by today and finished up the rewiring of the kitchen.  The wires that were running down the wall between the kitchen and dining room were either moved to the backsplash to the left of the sink for the disposal and under cabinet lights on that side.  The other we put on the far wall between the kitchen and dining room.   He also installed a GFI outlet on the stove side of the kitchen.  The phone wire was saved and an outlet on the remaining wall sheet rocked and spackled over.

To rewire did mean some wall damage to get the wires down the drain pipe column next to the sink.  Luckily it did not take too long and Lou was good about saving the pieces he cut out making it quicker to repair.


Kitchen wall repair almost done

It took all of a day but I got all the walls fixed and the first layer of joint compound on everything before the end of the day.  Tomorrow lots of sanding and another coat of joint compound.  Keep up for a few days and it should be looking pretty good.  At this rate the kitchen will be ready for paint by the end of the week.  Maybe next weekend I'll get the floor floated before the cabinets go in next Monday.

Happy rehabbing..


Tuesday, March 23, 2010

Rehab 4470 – We got the cabinets out and the kitchen wall down


We made good progress this weekend with the kitchen. The cabinets came out easily and were not glued to the wall like the last house (thank god!). Sean helped me take out the sink side and Jan and stove side. Removing the tile backsplash was a whole different issue. We had a couple of problems with the sink base and have to cut off the main drain.  The cabinet bases were also separate from the base cabinets.
Once the cabinets were out what seemed like an easy task of snapping the back splash tiles off and scraping off the glue resulted in the wall board being torn up so much I finally just cut the sheetrock out. We should have done it from the start and it would have saved 2-3 hours of fooling around with the tile.  It also gives the electrician a little more room to work when he moves the switches.  We are going to keep the undecounter lighting that was installed under the old cabinets and install it on the new cabinets.

Lou the electrician came by and we talked about the electric wires in the wall between the dining room and the kitchen. He determined, after crawling around the attic a bit, that he would able to relocate them and expects minimal wall repair to be needed. That was good news. The other good news came from reviewing the blueprints with brother in law Mike over the phone and coming to the conclusion that the wall between the dining room and the kitchen was NOT load bearing.  Once we got through those decisions out came the reciprocating saw and down came the wall. I also cut the wall down to 34.5” to make it flush with the new cabinets when they installed. All in all not to bad of a job with minimal wall repair needed once the electric gets rerouted. The effect we think will be dramatic and really make the kitchen pop once the granite goes in. It surprised both of us how much more open the kitchen looks even with wires hanging down from the ceiling.

The kitchen as you can see also has wallpaper (and the bathrooms) and the genius that put it up did not size the wall in advance. This means the wall is damaged in trying to get the wallpaper off. Jan got an estimate for someone else to do it and it came back at $1200 – ugh! So we consulted with Gene the paint guy at the local Lowes store. No magic wand it seems. Gene did however give us some tips to paint over it.

• First cut or remove any areas that are coming off the wall

• Spackle the seams and parts that were cut out

• When the spackle dries sand it flat repeating as needed

• Then prime the walls with oil based primer – this is key as latex may dissolve some the paper

• Texture as desired (I’ll use Billy’s machine hopefully)

• Then paint with latex color of choice

We’ll report how that technique works in a future blog.

The other good news is we sold the stove, dishwasher, and cabinets on craigslist in less than 24 hours. With the money we can pay someone to tear up the existing tile in the entryway, kitchen, and hallway to make way for the 20 x 20 porcelain. We also got the bamboo flooring on sale from Lumber Liquidators @ $1.79 sq ft. All in all a good week..

Happy rehab..

Tuesday, March 16, 2010

Rehab 4470 - Paint and Tearing it Out

After a couple of months Jan finally closed on the latest rehab property while I was out of town.  In the first week she painted the living room and den and pretty much got the doors down, verticals in the trash and valences out.  Along the way she found a new painting tool that took hours off painting the den when cutting the paint back from the ceiling.  She chose the tan color we've been very successful with in the past.  The picture shows the living room with patio sliders to the right and door to the master bed room to the left.

After a week of painting we spent a week on vacation and returned on Saturday all rested up.  Since I had been out of town for several weeks I had a need to spend some time at the house on Sunday to contribute.   I started on the Master Suite where I removed the carpet and tack strips.  I was happy to see that the carpet pad was not glued down like the last house.  From there it was into the toilet room to rip out the old tile, closet to rip out the carpet and then finally the linoleum in the master bath which after I got it half out realized I should have just tiled over it.


From there I decided to get some fresh air and start ripping out the landscape in the front yard.  After trying several times to crank up the chainsaw I gave up and we called it a day.  After all it was the last day of our vacation and we needed one last cocktail this time by our pool.

Monday, March 1, 2010

Rehab 4470 Starts on Monday

We close on the next home renovation property on Monday.  We received the HUD 1 last week with no real surprises and have already set up the utilities transfer and insurance.  There's a walk through on Monday morning and assuming the house has not burned down we'll close in the afternoon.  Then the fun starts to get the property back on the market in 8 weeks.

With this renovation we have the following plans so stayed tuned for lots of pictures:

Master Suite
  • Bedropom carpet replaced with wood (bamboo) or tile (20")
  • Wall paper removed from bedroom and bath
  • Millwork around Sliding glass doors in bedroom
  • Paint throughout / gloss white on Trim
  • Linoleum removed from bath and tiled (20" tile)
  • New vanity in batch (96") with granite counter
  • Ceiling fan in Bedroom
  • Tile replaced in WC (20")
  • Windows trimed out with Millwork
Living Room / Den
  • Carpet replaced with hardwood (bamboo)
  • Paint throughout / gloss white on Trim
  • Millwork around sliding glass doors
  • Windows trimed out with Millwork
  • Ceiling fans replaced
Kitchen / Dining Room
  • Wall between kitchen and Dining Room cut down to counter height.  Electic moved.
  • Wallpaper removed in dining and kitchen
  • New kitchen cabinets with granite counters and new sink
  • Tile kitchen backsplash
  • New Stainless Steel appliances
  • New light in Dining Room
  • Possilbly replace kitchen and dining room tile (20")
  • Windows trimed out with Millwork in dining room
  • Paint throughout with gloss white trim and baseboards
Bedroom
  • Bedropom carpet replaced with wood (bamboo) or tile (20")
  • Paint throughout with gloss white trim
  • Trim out window
  • Replace ceiling fan
Hallway Bath
  • Replace linoleum with tile (20")
  • Remove wallpaper
  • Paint throughout with gloss white trim
  • New vanity with granite
  • Picture frame mirror
Exterior
  • Replace rotted wood
  • Paint Exterior including soffits
  • Remove all current landscape before painting
  • New plants and outdoor lighting upgrade following paint
  • New house numbers
  • Replace entryway tile (maybe)
  • Fix / Replace broken screens
  • Seal driveway

Thursday, February 25, 2010

Great Deals Are Out There - Check This One Out

We continue to see some amazing real estate deals and ran across one recently that caught our interest and as a result we chased after it but unfortunately missed out on it.  Here's the details and be sure to check out the videos on YouTube for Bradenton Beach.  In about a week they recieved 9 offers.  It's a little unclear what the final offer was but suffice it to say it was a great deal.

The property is located at 2218 Avenue A in Bradenton Beach.  It was originally listed as one unit of a duplex but was actually for the entire building.  The building was bank owned and they priced it agressively at $395K. The vacant land was originally purchased for $695K and the developer got a $1.3M loan to build the duplex. It was foreclosed for $1.5M with fees and interest. The property was located on the water and nothing could be built on the water side of the street.  The original plans included a pool and dock.


View Larger Map

The ground floor had 2 - two car garages each that had an elevator to one of the floors. Each floor was approximately 1750 sq ft with a large front deck that overlooked the water. Both Units (floors) had the same 3 bedroom 2 bath floor plan, 9 foot ceiling with crown molding, tile and carpet throughout, wood cabinets with granite. The great room occupied the front half of the house and had 180 deg water views. The Kitchen looked out over the great room to the water and had all SS appliances, large bar and a separate ice maker.

The building never been lived in because the developer never got the CO (Certificate of Occupancy). In researching the bulding with the City there was a 2 page punch list that would have taken about $20K to $30K to knock out. One floor was for sale for $895K mid 2009. We estimate each floor to be valued at $500K once the CO was obtained and the building Condo'd.

Great deal that got away! That's ok I think we'll see more of these great deals.

Monday, February 22, 2010

Home Inspections Lower Risk

Home Inspections Lower Risk

In spite of (or really in addition to) our experience we always use a qualified home inspector when buying real estate. Seems as though they always find things I haven’t and also provide a good confirmation of things I may have found. You should always be present during the inspection and don’t be afraid to ask lots of questions. Home inspectors see a lot of situations and a good one can provide ideas that can save you lots of money or remedy situations. In some cases they provide an estimate of repair costs in their inspection report.

The picture to the right is of a house we rehabed.  The ceiling of the house had some staining and we thought there were major leaks.  The inspection showed no leaks but the roof still did show considerable wear and needed to be replaced.  Apparently the hurricanes that came through Florida over the past few years may have driven some rain in through the roof vents as a result of the high winds.
All home inspections are different and can vary dramatically from state to state, as well as across counties and cities. Much depends on the home inspector and which association, if any, to which the home inspector belongs. There are established standards published by a number of trade organizations and links are provided below to some of the more majoir ones.  Most all maintain blogs that can be searched. We recently purchased a property in Bradenton and Claude McGavic of Home Check in Sarasota performed the inspection.
Claude McGavic of Home Check can be reached at 941-807-4320 or by email at homechecker@tampabay.rr.com.

We appreciate you comments and thoughts on this posting and be sure to sign up as a follower.

Useful links on Home Inspections Associations

American Society of Home Inspectors

Florida Association of Building Inspectors

National Association of Home Inspectors

International Association of Certified Home Inspectors

California Real Estate Inspection Association

Useful Checklist links

http://www.inspectamerica.com/html/home_inspection_checklist.html

http://www.americanhomeinspectordirectory.com/inspection-checklist.html

http://office.microsoft.com/en-us/templates/TC060904191033.aspx

Thursday, February 18, 2010

The Real Estate Funnel - $ drip out the end

I'm adverse to risk especially when it comes to real estate investing.  As a result we look at a lot of real estate in an effort to understand the market and more importantly the market trends.  We tend to focus on a given area or neighborhood and then study it until we know it cold.  When I say "know it cold" it means we know the profile of all properties in that area including:
  • General trends and demographics of the area - are they coming or going?
  • Age and condition of the properties in the area - just because they are older homes does not mean they are not taken care of.
  • Home owner assoication or other fees - we just bought in a neighborhood that had a $100 application fee and $600 one time fee for new owners.
  • Past sales including asking price, sales price and days on market - Are they holding out and holding up values or are they leaving in droves?
To get to this high level of knowledge it takes us a lot of work and we find that the more we study an area or neighborhood the higher level of confidence we have when we make an offer.  The confidence is on both obtaining the property for a great price but also knowing that we will be able to resell at a higher price after the property is rehabed.  Obviously the bigger the difference the more money in your pocket at the end of the day.

Some of the ways that we learn about an area or neighborhood include:
  • Team with your realtor to provide you regular updates on whats for sale and what has sold.
  • Drive the nieghborhood and talk to people that live there - you'd be amazed what they'll tell you.
  • Visit open houses to get a feel for what the general condition of the properties are. 
  • Get you realtor to show you properties that may not have open houses.
  • Ask about association fees and special assessment - past and future.
  • What amenties are included with association fees - we live in FL and alot of communities are maintenance free.
  • Have any properties been updated?
After doing this on a regular basis you should get to the point when a property comes on the market you can estimate within 1-2% of what the listing price should be based on past sales without even seeing the listing.  The greatest advantage that we have found is that as properties come into the markets that we are monitoring we can act quickly when we see a bargain.  Couple that with some circumstances around the buyers motivation (death, estate, short sale, bank owned, etc.) and you could have a winner.  The other key is to know you market cold and move fast.  If you have the knowledge you'll be able to manage the risk even in this market.

Manage the risk through knowledge and don't be afraid to make some crazy offers.  You just might find you end with with a great piece of property.

Sunday, February 14, 2010

Rehab 4470 - In Search of Granite @ $27.50 sq ft

In Rehab 4470 we will be installing a total of 90+ sq ft of granite in the kitchen and baths.  In reality few people know the difference between good granite and less good granite, me included.  I always look for 3 cm thickness and slabs that had relatively uniform coloring and no big blemishes.  It's stone after all and since it comes out of the ground it should not be perfect.  For our rehabs we always want the best looking stuff for the lowest price - duh!

For the entire project I have estimated $50 sq ft for a total nearing $4500.  Last night I found a link on Craiglist for granite at $27.50 sq ft,  a considerable savings.  The ad stated that the cost included materials, fabrication and installation and  fabrication included 3 different edges, sink cutouts, faucet holes, electrical outlets, one time seal, template and install.  Was this too good to be true?

So today we called expecting some surprises.  A couple hours later we have driven to the shop and met Jhonny Castillo (that spelling is correct) of A Castillo Cabinetry in Riverview, Florida.  At the fabrication shop Jhonny greeted us warmly and questioned if it was us that had called earlier.   He then proceeded to show us the granite that was on sale for $27.50 sq ft.  In questioning him further he offered to take us to the yard to see more slabs and after a 10 minute drive we arrived.  Needless to say there was granite everywhere (video).

Jhonny Castillo  turns out is the owner of a 6 year family run business along with his wife.  He is of Columbian descent and actually started the business selling cabinets.  Now he moves considerable granite and is able to offer extremely competitive prices which does not endear him to the competition.  He stills sells cabinets but we've got that covered already.

The $27.50 got us in the door but we settled on a sligthly better granite that had a color more in line with the cabinets we are planning to install @ $33 sq ft.  We close on Rehab 4470 in three weeks and will most assuredly be doing buisness with Jhonny.  If you're looking for granite give him a shout.  The A Castillo Cabinetry website also provides an extensive portfolio of projects they've completed - check it out.  I'm guessing you won't be disappointed.

For an education on granite check out the All Stone Granite  and Ezines blog articles that provides a resource for questions around granite and use of granite in kitchens. 

Thanks Jhonny and looking forward to doing business.

Saturday, February 13, 2010

The "Wow!" Effect - Part 3 Add Some Color

The first time we painted a rehab with something other than white, beige, or other neutral color it felt risky. However, what we found was that color creates a "Wow!" when used the right way in coordination with the other elements of the house. We do however stick to very basic and complementary colors that seem to be everywhere (and popular) these days. The good news is the paint department at Lowes and Home Depot has already figured out what colors fit together with all those color strips. We do not cheap out on the paint quality and usually $5/gal makes a big difference in how the paint spreads and covers. The last rehab we used 24 gallons of interior paint which equals a difference of $120 more than the cheap stuff - I highly recommend you do the same, it'll pay off.

The Valspar website has a pretty cool on-line digital painter program that can be a great starting point when considering colors. When the Palette is displayed select "Modify Palette " and then the "Our Suggestions" Tab. The screen shots to the right should help.

We use no more than 3 colors per house with gloss white one of the colors for the baseboards, trim and doors.   We usually use a neutral color in the larger rooms like living rooms and colors in the bedrooms and kitchens.  We do not get too crazy with multiple colors in the same room.  If you are uncertain what to do in a room use the neutral color and remember if the color does not fit with the flooring, cabinets, etc. don't force it.

We are creatures of habit and when something works we do it over and and over.  Every once in a while we'll try something new but for the most part stick to the same colors.  Here's some examples of the colors we've used.

Kitchen rehab - We refaced the cabinetsand installed granite, added a piece of trim to the plant shelf and painted it white, nice green on the walls, faux stainless applicance package from Lowes, and last the cool lights rather than the old track lights.  Tile floors came with the house.


Bedroom Rehab - They had an ugly peach color and had cut a hole in the wall to the closet for something? We added hardwood floors (bamboo our favorite), gloss white on the trim and doors, patched the hole in the closet and replaced the shelving, and took a chance with the yellow. We also painted the adjacent bathroom the same yellow color. The windows were also trimmed out and painted gloss white. In the end the room popped and had a nice clean modern look to it.


One of the neutral colors we use extensively is made by Valspar as part of the Earth Elements collection.  It creates a nice contrast to wood floors and white woodwork.


Jan and I discuss the colors all the time and when we can't agree I usually give into her. Remember men are color blind.

Good luck in rehab!